Why Self-Drilling Screws Strip Out (And How to Get a Strong Fix Every Time)
Few things slow a job down like a self-driller that refuses to bite. You lean in, the driver chatters, the head starts to chew, and suddenly you’ve got a half-installed fixing that’s doing nothing except widening the hole. Most of the time, “strip out” isn’t random bad luck, it’s a predictable outcome of mismatch between the screw, the material, and the way it’s being driven.
If you’re buying or comparing tek screws, it helps to know why strip out happens in the first place. Once you understand the mechanics, you can usually fix the problem with one change, rather than repeating the same attempt and making the hole worse.
What “Strip Out” Actually Means
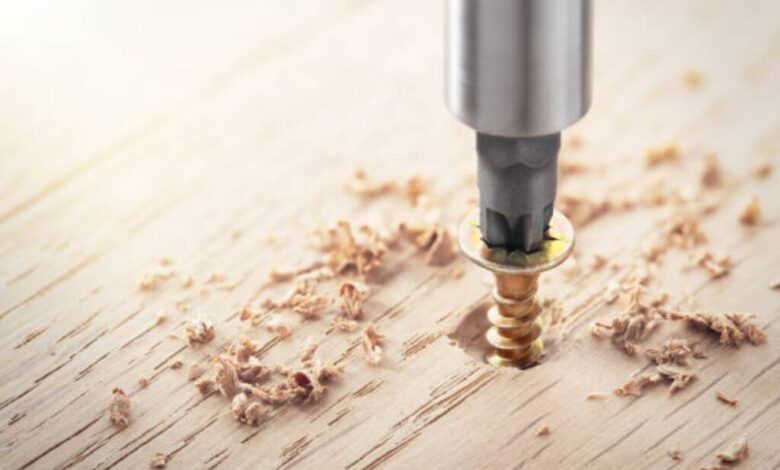
Strip out normally means the threads never properly form or hold in the substrate. In steel, that can look like the screw drilling a hole but failing to cut a stable thread, so it spins without grabbing. In thinner sections, it can mean the hole ends up too large relative to the thread, so the screw feels like it’s tightening but has very little real bite.
It can also happen at the head. When the bit slips repeatedly, the drive recess rounds off, which makes it harder to apply controlled torque. Once that happens, people instinctively push harder, which often makes the situation worse by overheating the drill point or driving the screw at a slight angle.
The Most Common Reasons Self-Drillers Strip Out
Strip out usually comes down to one of a handful of issues. The good news is that each one has a straightforward fix.
The first is a drill point that isn’t suited to the steel gauge. If the point can’t cut cleanly, it overheats and blunts, and the screw starts to fight you. You end up applying more pressure and torque just to get movement, which is exactly when threads fail to form properly or the hole gets overworked. On thicker steel, this is the classic cause of screws that spin and never truly bite.
The second is driver speed and pressure. Too fast and you generate heat that ruins cutting efficiency, especially if the screw is struggling. Too slow and you can end up polishing the surface rather than drilling cleanly. The sweet spot is steady speed with consistent pressure, allowing the drill tip to do its job rather than forcing it through.
Angle is another big factor. A screw driven slightly off-square will drill a less clean hole and the threads won’t seat evenly. Even a small angle can be enough to weaken the bite, especially in thinner steel. It also affects washer seating where washers are used, which creates extra movement and loosening later.
Bit choice matters more than most people think. A worn or incorrect bit leads to cam-out, chewed heads, and poor control. Once the head is damaged, you can’t apply smooth torque, so you end up with jerky driving that increases the chance of stripping.
Finally, there’s the simple issue of using the wrong screw length or thread for the application. If there isn’t enough engagement in the substrate, or the screw is designed for a different fixing scenario, it might “catch” but not hold reliably. That’s when the fixing feels tight for a moment and then spins.

How to Get a Strong Fix Without Overcomplicating It
The quickest improvement usually comes from matching the screw to the steel thickness. If you’re consistently struggling, stop assuming it’s technique and check whether the drill point you’re using is designed for the gauge you’re fixing into. A self-driller that’s perfect for a lighter section can be completely wrong for thicker steel.
Next, focus on control rather than brute force. Keep the driver square to the surface and apply steady pressure. If the screw isn’t cutting, don’t keep hammering away. Back out, reassess, and avoid turning one clean hole into a widened mess.
Pay attention to the start. The first second or two is where most strip out problems begin. If the screw skates, chatters, or starts at an angle, you’re already setting up a poor hole. Take the extra moment to start cleanly and square.
Use the right bit and replace it when it’s worn. It’s a small cost compared with time lost on damaged screw heads and failed fixings. A clean bit gives you smoother torque, better seating, and fewer mistakes.
When Pre-Drilling Is the Better Option
Self-drilling screws are designed to remove steps, not to make every situation possible. If you’re working with particularly thick steel, awkward angles, or critical alignment, pre-drilling can be the smarter move. It reduces stress on the screw and gives you more predictable results, especially when you need accuracy or you’re working in a spot where you can’t keep the driver perfectly square.
Pre-drilling can also help if you’re fixing near edges or in scenarios where you want to reduce the chance of the screw wandering at the start.
What to Do If You’ve Already Stripped the Hole
Once a hole is stripped, repeating the same screw rarely fixes it. You usually need to change the approach. Depending on the situation, that might mean moving the fixing position slightly, stepping up to an appropriate alternative fixing designed for the new hole size, or reworking the hole properly rather than trying to “make it work” with extra torque.
The important thing is to avoid enlarging the hole further. The more you spin in place, the less chance you have of creating a stable hold.
The Simple Takeaway
Most strip out problems happen because the screw is being asked to do something it wasn’t designed for, or because the driving method is turning drilling into overheating. Match the drill point to the steel gauge, keep the driver square, use a good bit, and prioritise steady control over speed. When those basics are right, self-drillers do what they’re meant to do: create a clean hole, form a strong thread, and leave you with a fixing that actually holds.